
At Water Damage Restoration Melbourne, we help Melbourne locals rescue their carpets after water damage. Whether it’s from a washing machine leak or a tap left running, our team knows how to fix small to medium water issues without tearing everything up.
In this guide, we’ll walk you through simple, step-by-step DIY methods to extract water from carpet, what tools to use, how to dry it safely, and when it’s time to call in the pros. Let’s get started.
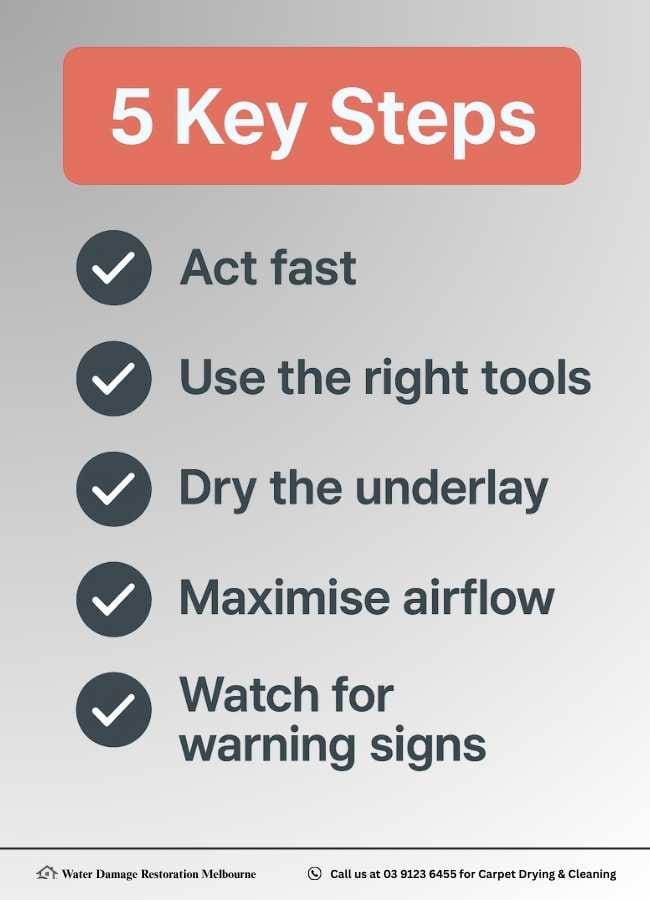
Key Takeaways
- Act fast: The quicker you respond to spills or leaks, the more likely you are to save your carpet and prevent mould. Begin extraction and drying within the first few hours.
- Use the right tools: A wet/dry vacuum is your best friend for DIY water removal. Baking soda is an excellent aid for residual moisture and odour control.
- Don’t skip drying the underlay: Surface drying isn’t enough, hidden moisture under the carpet and in the subfloor can cause serious issues like mould growth, musty odours, or floor damage.
- Maximise airflow: Improve indoor ventilation by opening windows and placing fans or using a dehumidifier to accelerate evaporation and control humidity.
- Clean and deodorise carefully: After drying, sanitise with a gentle cleaning solution and neutralise any lingering odours with baking soda.
- Watch for warning signs: If you notice musty smells, discolouration, or health symptoms, mould may already be forming especially if the carpet stayed wet for over 24 hours.
How to Extract Water from Carpet?
Step 1 – Stop the Water Source and Begin Surface Extraction
The first and most urgent action in any minor carpet flooding is to halt the source of water. Immediately turn off the affected tap, appliance, or pipe supply, and contain any further water spread with towels or buckets if needed.
Once the water flow is under control, begin surface water extraction right away. Use clean, absorbent towels to blot the saturated areas, firmly press them into the carpet to draw out moisture, and step on them if necessary to maximise absorption. Replace towels as they become saturated to ensure effective removal.
If you have access to a wet/dry vacuum (also called a shop vac), this is the most efficient DIY tool for pulling water from the carpet fibres and the underlay without damaging the materials. These vacuums are specifically designed for wet environments unlike regular household vacuums, which are unsafe and can be permanently damaged when exposed to water.
Pro Tip: Avoid scrubbing or rubbing the wet carpet. This can damage delicate carpet fibres, distort pile direction, and drive water deeper into the underlay. Always blot or press to prevent fibre disruption and encourage surface moisture removal.
Need Help Stopping a Water Leak? Reach Out to Us for Help ➔Step 2 – Use Proper Tools for Water Extraction
After removing surface moisture, the next step is to target residual or excess water that may still be trapped in the carpet padding and subfloor layer. Efficient extraction is crucial to prevent prolonged dampness, which can lead to mould formation or subfloor deterioration.
Recommended Tools for DIY Water Extraction:
1. Wet/Dry Vacuum (Shop Vac)
Glide the vacuum slowly across the wet area in overlapping strokes, ensuring deep suction through the carpet fibres and into the underlay. Repeat until no visible moisture appears in the vacuum tank. This tool is ideal for minor to moderate water spills and provides controlled extraction without damaging the carpet.
2. Submersible Water Pump
Only necessary in cases where standing water is present, such as in bathroom overflows or laundry room leaks. These pumps are more suited for several litres of water and help clear pooled water before carpet extraction begins.
3. Baking Soda
After visible water is removed, evenly sprinkle baking soda over the damp zone. Known for its moisture-absorbing and deodorising properties, baking soda helps eliminate residual dampness and neutralises odours. Allow it to sit for several hours, then vacuum it up thoroughly with a dry vacuum.
Safety Tip: Always spot-test baking soda on a hidden carpet section to ensure it won’t discolour or react with specific carpet dyes or fibres.
Step 3 – Properly Dry the Carpet, Padding, and Subfloor
Once water extraction is complete, the next critical phase is thorough drying. Moisture trapped beneath the surface within the carpet underlay or on timber/concrete subfloors, can easily trigger mould growth, unpleasant odours, or material degradation if not addressed.
Follow these steps to speed up the drying process and ensure no moisture remains hidden:
1. Ventilation First
Open windows and doors to increase natural air circulation. This helps lower indoor humidity and begins evaporating trapped moisture.
2. Use Fans Strategically
Position oscillating or high-velocity fans to blow across the wet carpet area. Direct airflow enhances evaporation at both surface and subsurface levels.
3. Deploy a Dehumidifier
If available, run a dehumidifier in the affected room to remove excess moisture from the air. This significantly accelerates drying, particularly in rooms with limited airflow or during humid weather.
4. Glued-Down Carpets
If your carpet is permanently affixed and cannot be lifted, focus on maximising airflow and reducing room humidity. These methods are typically sufficient for minor water incidents caught early.
Pro Tip: Don’t assume a carpet is dry just because the top feels fine. Residual water may remain in the underlay or base layers; always rely on airflow and drying time to ensure full moisture removal.Book a Moisture Check Today ➔
How to Handle Delicate or High-End Rugs After Water Damage
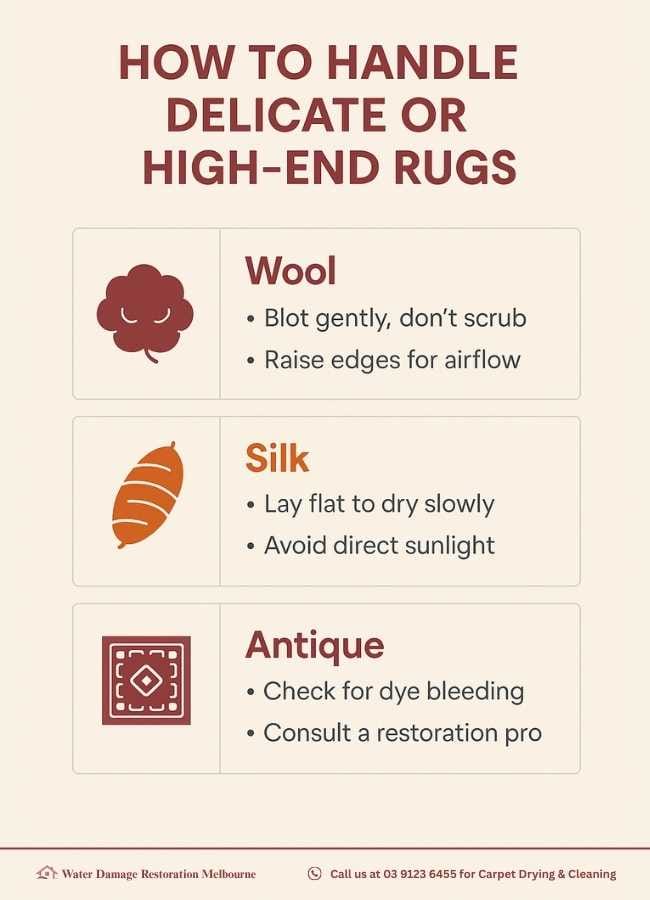
Why Special Care Matters
Delicate rugs like Persian rugs, Oriental carpets, silk rugs, wool area rugs, and antique textiles, are highly sensitive to water. Their natural fibers (wool, silk, cotton) can shrink, bleed dyes, distort shapes, or retain mould and mildew if mishandled. Unlike synthetic rugs, these materials demand specialised care.
Step 1: Identify Rug Material and Risk Level
Check rug labels, appraisals, or purchase records.
- Wool rugs: prone to shrinkage, felted texture.
- Silk rugs: prone to color bleeding, delicate weave.
- Cotton blends / synthetic rugs: more DIY-tolerant.
- Antique rugs: higher restoration risk; often irreplaceable.
Examine for dye bleeding, weakened backing, or pile distortion. If you notice color runs or brittle fabric, stop DIY drying and contact a rug restoration specialist or textile conservator.
Step 2: Blot Excess Water (No Rubbing!)
- Use white cotton towels, unprinted paper towels, or microfiber cloths.
- Gently press with palm or soft flat object to absorb water.
Avoid wringing, twisting, or scrubbing; this damages knots, wefts, and pile.
Step 3: Elevate and Ventilate
- Lay rug flat on a dry, clean surface; lift edges for airflow.
- If possible, drape over wooden drying racks or clean railings (avoid metal to prevent rust stains).
- Place absorbent layers (e.g., towels, unbleached muslin) underneath.
Use fans, dehumidifiers, or gentle cross-ventilation to speed drying. Do not use heaters, hair dryers, or direct sunlight, they can shrink fibers and set stains.
Step 4: Seek Professional Post-Drying Care
Even if DIY drying seems successful, dense natural fibers can trap moisture, inviting mould, odours, or alkaline imbalance. Professional rug care services can:
- Perform mould prevention treatments.
- Apply pH-balancing conditioning.
- Re-secure weft and warp tensions.
- Restore color vibrancy and pile softness.
Look for certified rug cleaners, textile restorers, or antique rug specialists—avoid general carpet cleaners.
Specialist advice: Natural dyes in Persian and Oriental rugs are often acid-based and highly sensitive to pH changes from water exposure. DIY cleaning without pH-neutral solutions can lead to permanent colour shifts.
Step 4 – Inspect Beneath the Carpet for Hidden Moisture
Even if the top layer feels dry, residual water may still be lurking beneath your carpet, particularly in the underlay (padding) or on the timber or concrete subfloor. Left undetected, this moisture can lead to mould growth, musty odours, or flooring damage.
Here’s how to safely check underneath:
- If your carpet is not glued down, wear gloves and gently lift a corner, ideally from a wall edge near the water entry point.
- Examine the carpet backing and underlay. If either feels damp, emits a sour or musty smell, or shows discolouration, it may be too waterlogged to save and should be replaced.
- Touch the subfloor surface (whether concrete slab or timber floorboards) for signs of moisture or cold dampness. A wet subfloor will prolong drying time and potentially cause wood warping or efflorescence.
- Blot any moisture beneath the carpet or in the padding using dry absorbent towels. Avoid excessive pressure to prevent tearing or fibre damage.
If the materials beneath are dry, lay the carpet back down carefully and resume drying the surface using fans and dehumidifiers.
Important: Never skip this step; many water-damaged carpets appear dry on the surface while hiding extensive moisture underneath.
Step 5 – Clean the Carpet, Neutralise Odours, and Guard Against Mould
After extracting and drying visible moisture, it’s vital to sanitise the carpet surface and eliminate lingering odours. Even if the water source was clean (e.g. tap or appliance leak), microbial growth can begin within 24–48 hours if moisture lingers in the carpet fibres, underlay, or subfloor.
Cleaning After Clean Water Spills
- Mix a mild carpet shampoo or white vinegar and water solution (1:1 ratio) and lightly spray the affected area. Gently blot (do not scrub) using a clean cloth to lift surface residue and freshen fibres.
Deodorising and Absorbing Leftover Dampness
- Even after drying, odours can linger. Sprinkle a generous amount of baking soda over the dried area to absorb remaining moisture and neutralise smells.
- Let it sit for 2–4 hours (or overnight for stronger odours), then vacuum thoroughly using a dry vacuum.
Signs of Hidden Mould to Watch For:
- Musty, earthy odours that persist despite cleaning.
- Dark stains, fuzzy growth, or discolouration on the carpet or skirting boards.
- Increased allergy symptoms, respiratory discomfort, or skin irritation indoors. The EPA highlights that mould can begin growing within 24–48 hours in damp areas and may produce allergens, irritants, or toxins
These may indicate mould contamination, especially on natural fibre carpets, carpet padding, or timber floors.
If you notice any of these signs or if the water exposure lasted longer than 24 hours; contact a professional carpet drying service in Melbourne for inspection and mould remediation. Early action protects your home’s indoor air quality and prevents structural damage.
You can also explore proven ways to repair water-damaged carpet if you’re aiming to restore rather than replace it.
Pro insight: White vinegar works not just as a deodoriser but also lowers the surface pH, making it less friendly to mould spores and bacteria — though it should never replace professional antimicrobial treatments in severe cases.Schedule a Professional Mould Inspection Today ➔
Common Mistakes to Avoid When Drying Wet Carpet
Even with the best intentions, it’s easy to make mistakes that can cause permanent damage to your carpet, underlay, or subfloor. Here are the most common pitfalls and how to avoid them.
1. Using Heaters or Hair Dryers
- Shrinks carpet fibres, especially wool or natural blends.
- Sets stains or watermarks permanently.
- Damages carpet backing or adhesives on glued-down carpets.
2. Scrubbing or Rubbing the Carpet
- Breaks delicate fibres.
- Distorts carpet pile.
- Pushes water deeper into the underlay.
3. Skipping the Underlay and Subfloor
- Leaves hidden moisture, causing mould and odours.
- Gives a false sense of dryness.
4. Walking on Wet Carpet
- Compresses wet fibres and padding.
- Spreads moisture further.
- Increases slip hazards near hard floor areas.
5. Assuming All Carpets Are DIY-Safe
Delicate rugs, glued-down carpets, or those exposed to grey/black water often need professional help.
Tip: Before you move on, make sure to avoid these common mistakes that can set back your progress.
When It’s Time to Call a Professional Carpet Drying Service
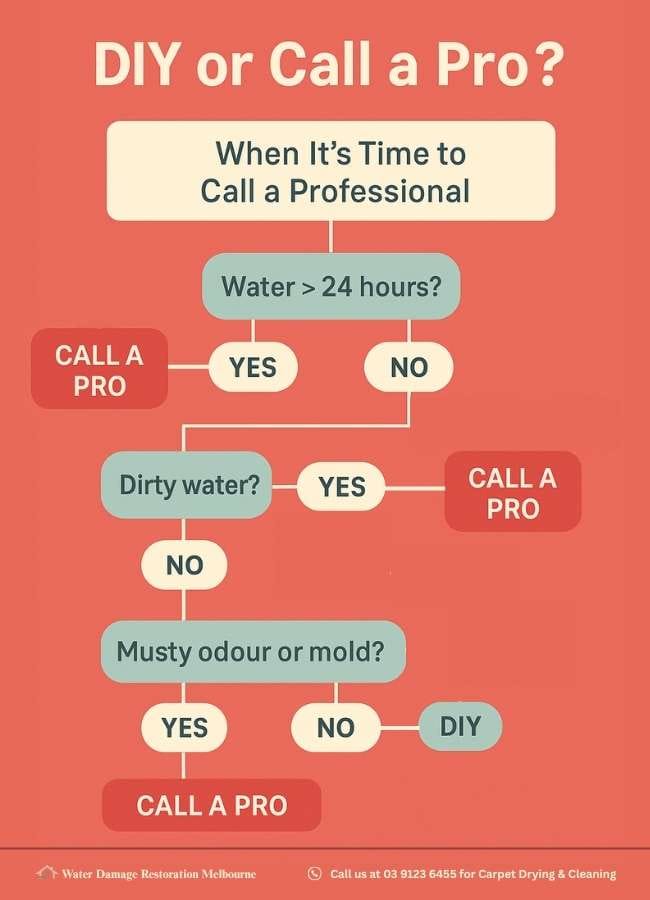
While DIY water extraction works for small, surface-level spills involving clean water, more serious incidents demand expert assessment and equipment. Delays or missteps in drying can lead to mould, odour, or irreversible damage to your carpet, underlay, or subfloor.
We’ve also outlined exactly what to do when only your carpet is affected by flooding so you can act quickly and prevent bigger problems.
Contact Water Damage Restoration Melbourne immediately if any of the following apply:
- The carpet has remained wet for more than 24 hours, increasing the risk of mould formation.
- The water came from a grey water or black water source, such as a washing machine overflow, toilet leak, or stormwater intrusion.
- You’re unable to lift or inspect the carpet underlay, particularly in areas where moisture might be trapped beneath.
- There’s a persistent odour, visible signs of mould, or health symptoms like allergies or breathing issues.
Our trained technicians use advanced tools like thermal imaging, moisture meters, and commercial-grade air movers to detect hidden saturation and ensure thorough drying. We follow IICRC protocols to restore water-damaged carpets safely, preventing costly replacements and health hazards.
Let us resolve the issue before it escalates into permanent damage or contamination.
Quick Summary: How to Extract Water from Carpet (Without Damage)
- Act fast: Stop the water source and begin blotting the wet carpet immediately to prevent mould and permanent damage.
- Use proper tools: A wet/dry vacuum (shop vac) is the best DIY option for pulling water from carpet and underlay safely. For standing water, use a submersible pump first.
- Dry thoroughly: Boost airflow with fans and dehumidifiers, and open windows to lower humidity. Don’t rely on surface dryness, check under the carpet and underlay.
- Inspect beneath: Gently lift carpet corners to check the underlay and subfloor. Blot hidden moisture and ensure everything is dry before relaying.
- Clean and deodorise: Use mild cleaning solutions or vinegar-water mix, followed by baking soda to absorb residual dampness and odours.
- Avoid common mistakes: Don’t use heat, don’t scrub, don’t skip underlay checks, and avoid walking on wet carpet.
- Know when to call pros: If water exposure lasted over 24 hours, involved dirty water, or if you detect mould, call a professional drying service.
Need Help With a Soaked Carpet?
Water Damage Restoration Melbourne are experts in carpet drying, water extraction, and mould prevention. We are a professional drying service with over 20 years in service.
Contact Us Today ➔Frequently Asked Questions
Can I use a regular vacuum on a wet carpet?
No, you cannot use regular vacuum on a wet carpet, because using a standard household vacuum on wet carpet is unsafe and can cause electrical hazards or damage the machine. Regular vacuums are not designed to handle moisture and may short-circuit or spread water further into the carpet fibres.
Will baking soda really help dry carpet?
Yes, baking soda is highly effective for drawing out residual moisture and neutralising musty odours from damp carpets. After the primary drying process, sprinkle a generous layer of baking soda over the affected area. It works by absorbing leftover dampness trapped in the carpet fibres and underlay. This simple step not only aids in moisture control but also refreshes the carpet naturally without the use of harsh chemicals.
How do I know if my subfloor is wet?
To check for subfloor moisture, gently lift a corner of the carpet using gloves and inspect the underlay and the flooring beneath, whether timber or concrete. If the surface feels cold, damp, or emits a musty or sour odour, it’s a strong sign that moisture is still present.
Can carpet dry on its own?
Technically, carpet can dry naturally over time, but relying on passive evaporation is risky. Without proper airflow, residual moisture trapped in the carpet fibres, underlay, or subfloor can linger long enough to trigger mould growth, musty odours, and even flooring damage within 24–48 hours.
Is it safe to walk on wet carpet?
Not ideally safe to walk on wet carpet. Walking on wet carpet can spread moisture deeper into the carpet fibres and underlay, increasing the risk of mould growth and prolonging drying time. It can also be slippery, raising the chance of accidental slips or falls, especially on hard flooring transitions. If you must walk over a damp area, use clean shoes or protective coverings and avoid heavy foot traffic to minimise fibre compression and bacterial transfer.


